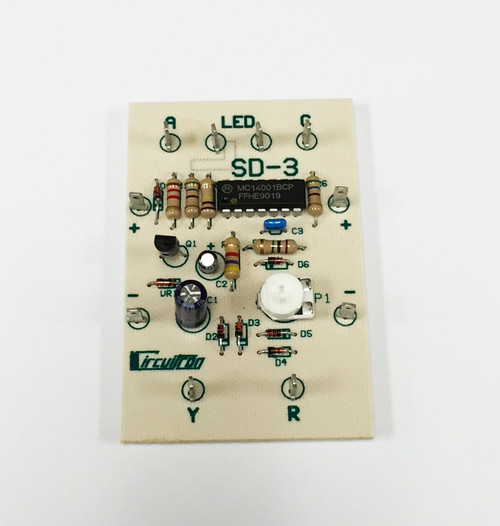
Circuitron SD-3 Tri-Color LED Signal Driver ~ 5530
The CIRCUITRON SD-3 is designed to drive any type of Bi or Tri Color LED single
target signal. The outputs of the SD-3 can accomodate 2 lead or 3 lead LED types. NOTE: The SD-3 will not
control multiple LED type signals where red, green and yellow are separate LEDs. A CIRCUITRON SD-1 is
recommended in this case.
The SD-3 accepts negative (-) control signals from CIRCUITRON detection circuits such as the BD-1 and will
drive the LED to indicate red, green and yellow aspects. NOTE: A minimum of 2 blocks of detection (home and
following) are required to provide all three aspects from the SD-3. Yellow is achieved by alternately lighting the red
and green LED chips at a high frequency. The eye perceives this mix of red and green as yellow. A hue adjustment
is provided on the SD-3 to allow adjusting the yellow color. NOTE: Certain brands of LEDs produce a more
convincing "yellow" than others, and this is due to the type of LED chips used, their location and the amount of
diffusion built into the epoxy body. Poor LED design will yield distinct red AND green zones at the front of the LED
rather than the appropriate "yellow" mix. Contact the signal manufacturer if this occurs.
The SD-3 requires a 10 - 18 volt AC or DC input, however, DC will have to be used if the SD-3 is connected to a
DC output Detection circuit such as the CIRCUITRON BD-1.
CIRCUIT DESIGN: The SD-3 utilizes a CMOS NOR gate package configured as an astable multivibrator with
complimentary outputs direct driving the LED. The astable features full range variable duty cycle which allows
complete adjustment of the "yellow" hue. A zener diode & series pass transistor regulate the input voltage to 11
volts to avoid excessive power dissipation in the gate package.
INSTRUCTIONS: The SD-3 can be connected with .110" solderless connectors or by soldering leads directly to
the terminals on the printed circuit board. If soldering, use a small pencil-type iron and electronics-grade rosin core
60/40 solder (available at Radio Shack). Use only as much heat as necessary to obtain a good joint and do not
wiggle the terminal until the solder has cooled completely.
1. Mount the circuit board in a convenient location. A section of CIRCUITRON's PCMT makes this a simple task, or
the mounting pads in the corners of the board may be drilled out and the circuit mounted with screws.
2. If your signal utilizes a 2 lead Light Emitting Diode, merely run two light gauge (22 - 24 ga.) wires from the signal
to the two terminals at the top of the SD-3 board labeled . Make the connections temporary at this time.
3. If your signal utilizes a three lead Light Emitting Diode, the two outside terminals of the LED are wired to the
terminals on the SD-3 as in (2) above. The center lead will connect to either the or terminal on the
SD-3, depending on whether the LED is constructed with the anodes or cathodes connected together internally.
If your signal instructions do not tell you which design they use, try the common cathode connection, , first.
If you get no light from the LED, switch the wire to the terminal.
4. Connect the and terminals on the SD-3 to a 10 - 18 volt DC source. Leave your power source OFF during
these connections. AC may be used to power the SD-3, but if the SD-3 will be connected to Detection Circuits
for automatic operation, then DC MUST BE USED! You will notice that the supply terminals, and are
bussed across the board so that multiple SD-3 installations are easily wired. Merely connect to and
to for daisy-chained installations.
5. Apply power to the board. The signal LED should light "GREEN". If it comes on "RED", turn power off and
interchange the two wires connected to the terminals on the SD-3. Firmly attach these two wires at this
time. Turn the power back off until all other connections are complete.
6. For automatic operation, connect a wire from the terminal on the SD-3 to the output from a CIRCUITRON
detection circuit installed for the SAME block that the signal is supposed to protect. This terminal is labelled
in the case of the BD-1. With this connection, the SD-3 will now display 2 aspect signals (red and
green). This block is designated the HOME block and will be referred to as such in the diagrams.
7. Connect a wire from the terminal on the SD-3 to the output from a CIRCUITRON detection circuit installed for
the block following the HOME block above. This block is designated the FOLLOWING block. Refer to figure 1
for further clarification.
8. Set the yellow hue adjustment trimmer, P1, to the midpoint of its rotation.
This completes the installation. Run a train through the blocks and note that the signal properly displays all three
aspects. Rotate the trimmer to adjust the yellow hue to your liking.


